Categories
Apple macOS

Light mode with a dark Menu Bar and Dock using macOS Mojave

macOS Mojave (10.14) was released today, and if you’re like me, you may have decided that dark mode is not for you. Well, I stumble across a site that helped me regain the appearance of High Sierra that I was used to: a light theme with a dark Menu Bar and Dock.

To enable:

defaults write -g NSRequiresAquaSystemAppearance -bool Yes

To disable:

defaults write -g NSRequiresAquaSystemAppearance -bool No

However, this method ended up breaking a few apps and generally it didn’t work out the way I wanted, so I reverted. That’s when Firefox started having a fit, visually speaking, and I noticed in the comments (on the site above) that I wasn’t alone. I tried to reply to the user having the same trouble, but I don’t have a Disqus account (and you’re the product) so I’m writing it here in case anyone has this same issue.

The issue can be fixed by running the following in terminal (assuming you used the command from the article above):

defaults delete -g NSRequiresAquaSystemAppearance

I didn’t need to log out (or restart), Firefox just started working.

I’m actually hoping that dark mode improves over time, or at least that apps better support it. For now, I’ll settle for the default light mode.

Categories
Apple macOS

Removing .DS_Store Files

With the released of macOS 10.13 High Sierra, I did a review of my installed applications to make sure an upgrade would be as painless as possible. One item that caught my eye was Lingon X, which I use solely to remove .DS_Store files via launchd. You can manage this yourself, but Lingon X is so straightforward that it’s easily worth the cost ($10).

Within Lingon X, under the me section, I “named” my script:

local.dsstore.com

For the “Run” command I provided the following:

/usr/bin/find /Users/[user] -name *.DS_Store -type f -delete

Note: be sure to replace [user] with your actual user account. Interestingly, I tried using ~ (tilde) to indicate my own home folder, but Lingon X said that would result in an error.

Lastly, I selected “Scheduled” and decided to run this every 15 minutes.

Everything works as expected, and sometimes, if I’m really bored, I do something in Finder to create a .DS_Store file and, like watching paint dry, wait until my script runs and removes it.

Categories
Apple CakePHP Development

macOS + MAMP + CakePHP (bake)

Are you using macOS, MAMP, and trying to bake some CakePHP code? Are you having trouble because you get an error in Terminal such as this:

Fatal error: You must enable the intl extension to use CakePHP.

And I bet all you did was browse to your CakePHP site and tried to run this:

bin/cake bake

Well, you could install intl via Homebrew or one of the half-dozen other solutions I found, or you could simply do the following:

  1. Install/upgrade to MAMP 4.x
  2. On the left, select Languages > PHP
  3. Select the checkbox labeled: Make this version available on the command line.
  4. Click Save

Once you’ve done, open up Terminal again (if it’s already open, type exit and Quit Terminal first before trying this again) and browse to your CakePHP site. This time, instead of what you typed above, simply type the following command:

php bin/cake.php bake

This should work just fine, as php is now aliased to the MAMP PHP version (step 3 above), which has intl install, and you’re specifying the PHP script directly, bin/cake.php, and together you’ll be able to bake all the CakePHP code you need.

Categories
Apple macOS

macOS Sierra 10.12 SSH Keys

I updated to macOS Sierra 10.12 (GM) tonight and surprisingly everything seemed to work without any issues … at least so far. One thing that did come up, but was easily remedied, was that all of my SSH keys stopped working.

ssh git@github.com

The above command prompted for a password (assuming you use GitHub), which is should not do if SSH keys are set up properly.

Assuming your SSH keys are RSA-based, I have a quick solution:

cd ~/.ssh

This will get us into our user SSH folder

ssh-add -l

This lists all keys that the SSH agent knows about. After upgrading, this returned zero keys! Note: In reality ssh-add is session-based, and so each time you log in this command will show zero results (see below).

ssh-add -K ~/.ssh/[your-private-ssh-key-name]

You’ll be asked for the password (if one is set) for this private key

-K tells ssh-add to save the key into your Keychain, so that on subsequent logins, even if ssh-add -l shows nothing, ssh will also look in your Keychain to see if the key is save there.

[your-private-ssh-key-name] is likely id_rsa, but it could be others as well

Repeat step 3 as needed

ssh-add -l

You should now see you SSH key(s) listed

That worked for me, though oddly I had to do this process twice as the first time I made it to step four, then exited Terminal, none of my applications using SSH worked, I opened Terminal again and found that nothing was listed when I ran the ssh-add list command.

UPDATE:

This doesn’t seem to do what I thought it should, namely, upon reboot I had to repeat this process again. I have since added the following steps:

cd ~/.ssh/
sudo vim config

I then added this line to my SSH config file:

IdentityFile ~/.ssh/[your-private-ssh-key-name]

I saved the config file, and now my SSH keys work as expected.

UPDATE 2 (19 Dec 2016):

With Apple’s update to 10.12.2 I found myself having SSH issues yet again. A bit of searching pointed me to the updated man pages as seen via Terminal:

man ssh_config
AddKeysToAgent
    Specifies whether keys should be automatically added to a running ssh-agent(1). If this option is set to ``yes'' and a key is loaded from a file, the key and its passphrase are added to the agent with the default lifetime, as if by ssh-add(1). If this option is set to ``ask'', ssh will require confirmation using the SSH_ASKPASS program before adding a key (see ssh-add(1) for details). If this option is set to ``confirm'', each use of the key must be confirmed, as if the -c option was specified to ssh-add(1). If this option is set to ``no'', no keys are added to the agent. The argument must be ``yes'', ``confirm'', ``ask'', or ``no''. The default is ``no''.
UseKeychain
    On macOS, specifies whether the system should search for passphrases in the user's keychain when attempting to use a particular key. When the passphrase is provided by the user, this option also specifies whether the passphrase should be stored into the keychain once it has been verified to be correct. The argument must be ``yes'' or ``no''. The default is ``no''.

I eventually landed on the following inside my config file (~/.ssh/config), erasing everything I had added in the first UPDATE.

Host *
  AddKeysToAgent yes
  UseKeychain yes
  IdentityFile ~/.ssh/[your-private-ssh-key-name]

Afterwards I restarted to flush anything in SSH and noticed that everything was working correctly again. At this point, it’s probably a good idea just to start with this, assuming you’re running at least macOS 10.12.2.

Note: The above example I actually repeated three times since I have more than one SSH key that I need to use. Just copy and paste, being sure to update your private key filename.

Categories
Apple Internet

Cincinnati Bell FiOptics Gigabit

Just a quick note about Cincinnati Bell FiOptics Gigabit service, it’s pretty much fantastic. I ran this tonight (2014-10-06 23:16:45 EDT), and although I’ve had the download a bit faster (as much as 850 Mbps), this is still amazingly fast internet.

speedtest

But one thing I think that’s worth mentioning, and something Cincinnati Bell does at least a decent job of doing themselves, is that you will not be able to achieve these speeds without hardware to support gigabit internet. Without actually looking it up, I would guess that most Macs built within the past 5 years (or so) have a gigabit Ethernet port. More recent PCs probably have this as well. But what will really trip you up is your network hardware. In my household we have a number of Apple Airport Extreme’s which have gigabit ports, both on the LAN and WAN ports. What I discovered, however, is that converting a WAN input (from the FiOptics 1 Gbps service) to a useable 1 Gbps LAN output is not as simple as making sure the WAN and LAN ports are the gigabit variety. The best my Apple hardware could muster is about 250 Mbps. I ended up referencing the following WAN to LAN chart in order to find a router capable of converting WAN to LAN at the full 1 Gbps. As you can see via my results above, accounting for overhead and some network congestion, I’m pulling (more or less) the 1000 / 250 Mbps connection I was told I could receive. I say “could” because they only guarantee 300 Mbps down … I’m not sure what an acceptable upload speed is.

In summary, the speed is fantastic.

2014-10-07 Update

I found a Speedtest.net server in Chicago (Comcast, ironically) that would allow me to test at 1 Gbps.

2015-04-07 Update

Speeds are as good, if not better, 6 months later. I see fiber lines going up (or already up) all over the city. If you can get FiOptics Gigabit service, I highly recommend it!

speedtest_2015_04_07

2015-10-27 Update

While Speedtest.net speeds are still good, depending on the server you hit, you never see these speeds in real-world usage. Even big companies like Apple or Microsoft that use CDNs don’t allow (or cannot provide due to capacity constraints) much more than 100 – 150 Mbps. That said, most places will let you upload at almost full speed (~ 200 Mbps), which when compared to typical upload speeds of < 10 Mbps almost makes it worth it.

2016-03-05 Update

Download and upload speeds still seem to be just as high as ever, though as noted before, one rarely sees these kinds of speeds unless downloading from multiple sources at once. During peak hours, I may still be able to pull over 500+ Mbps on a bandwidth test but have Netflix or iTunes on the Apple TV essentially have to buffer the content before I can view it.

Something I’m interested to see pan out is comparing my 1000 / 250 Mbps service at home with my 100 / 50 Mbps service at the office. So far I haven’t been able to tell a big difference between the two speeds, but it is noticeable, especially when OS X or iOS updates are released and all the devices in the office are updating at once and the office connection becomes saturated.

2016-07-14 Update

More of the same, which is certainly good news!

2016-12-28 Update

No matter how when I try, I don’t seem to be able to pull anything close the the above speeds using speedtest.net. Even from Cincinnati Bell’s own speedtest page, I get about 550 / 200 Mbps and no more. I just so happened to wander over to DSLReports and ran their speedtest and was happier with those results. I’ll likely continue to use them instead of anything else, though I feel like I’m fishing for a speedtest that shows me what I want to see. Anyway, here is what I was able to get tonight:

The C rating for Top Speed is based on my own value of 1000 Mbps, though clearly I wasn’t, nor ever will, get anything near that speed in real-world scenarios.

2017-07-09 Update

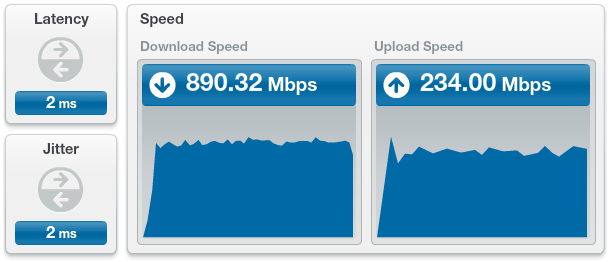
Per my last update, speedtest.net tests hadn’t been coming close to anything I used to get, however, today I ran one just for fun and received the following:

That’s inline with what I had been receiving, so I’m glad to see those sorts of results. FiOptics continues to be fast overall, though I’m still disappointed that some major providers cannot (or will not) transmit data more than about 100 Mbps. Services like Netflix are still essentially instant. The part I’m most used to day-to-day is that we can have many devices streaming or downloading (or uploading; backups) and no single device is ever affected by any another.

For anyone that might be interested, when you take two FiOptics locations with similar speeds (my office being the other location; 500 / 125 Mbps) and connect them via a VPN tunnel, it feels as if everything is on the same local network. I have Ubiquti UniFi products installed at these two locations, so creating a VPN connection between locations is very easy. With that connection in place I can remotely control devices and have the same (lag) experience as if I were onsite. It’s an unexpected benefit that has proven very useful.

I continue to recommend this service to anyone who is OK paying the price premium — it has been a solid decision thus far.

2017-11-25 Update

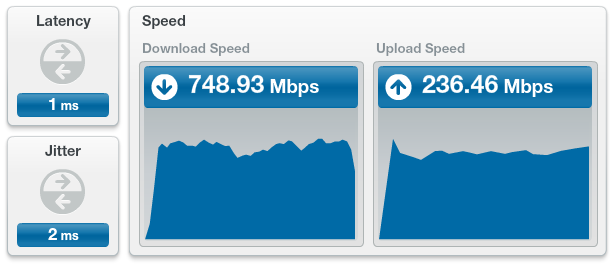
Recently I’ve been testing out some new networking firmware, but ended up needing to revert to their stable codebase. Just to make sure things were working correctly, I performed a random speedtest.net test and received the following:

This is an a holiday weekend, so I’m guessing the tubes are light this afternoon (12:34 eastern), but I felt the result was pretty superb considering I have Spotify streaming, and the TV is streaming PBS in the other room.

I also realized that I’ve had gigabit service for three years now, and my only real complaint is that I assumed it would be cheaper now. At my location, I essentially have zero downtime, and I never notice any services being sluggish — though sometimes Netflix can take an extra second during the prime TV viewing hours.

FiOptics gigabit is still something I would recommend!

2018-04-24 Update

2019-11-28 Update

2020-08-09 Update

2021-12-07 Update

Categories
Apple macOS

AirPort Utility 6.x “Flash on Activity”

The other day I updated the AirPort Extremes in my house, resetting them to their default settings. When I had everything up and running again, I noticed they no longer flashed with activity. I searched through the AirPort Utility 6.x (6.3.2) installed on Mavericks and could not find this setting. I searched DuckDuckGo and found a lot of other people longing for this option, too. Since you cannot install (can you?) AirPort Utility 5.x onto Mavericks, I ended up installing 5.x onto my Windows 7 VM. There I was able to find the setting, make the change, and was happy again.

But what if you don’t have a Windows VM? What if all you have is Mavericks? Well, I have an easy enough solution for you. In AirPort Utility 6.x, export your AirPort configuration file and save it to your desktop. Open this file with a text editor (such as Sublime or vim) and search for “leAC” (lower case L).

<key>leAC</key>
<integer>1</integer>

Change this to:

<key>leAC</key>
<integer>2</integer>

Save the file, go back into AirPort Utility 6.x and import this configuration file. Don’t change anything else in your file, just the 1 into a 2. This tells your AirPort that you’d like it to “Flash on Activity”. Let the AirPort restart and take note and the wonder that is a flashing green LED.

2014-10-06 Update

It seems this trick does not work on the latest Airport Extremes with 802.11ac. Even with the above set, the LED on the front of this device does not flash.